Hosted by the  .
.
-
-
Xecuter X3 XBOX Modchip BIOS User's Manual
X3 BIOS Tools Screen
This section
covers the BIOS Tools screen functions and features. The X3 BIOS has built in
functions for flashing the Main and Backup ROM.
- Index
<< X3 Config Live Screen
Disk Tools Screen >>
- Contents:
- Flash Main ROM
- Flash Backup ROM
- BIOS Bank Select
- BIOS Bank Naming
-
- BIOS Tools Screen:
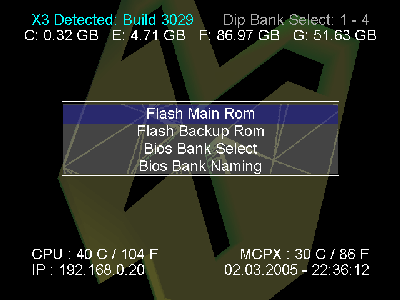
- The following screen is used to flash the Main ROM, flash the Backup ROM,
select a different bank of the BIOS, and name the BIOS banks.

-
- Flash Main ROM: Click this one to update AKA
"flash" your main ROM with a new BIOS.
- The Xecuter X3 Modchip has 8 banks of 256KB of memory per bank for a total
of 2048KB of storage. The standard X3 BIOS is 1024KB so it requires four
consecutive banks of memory on the modchip. The remaining banks are usually left
unused or have other BIOSes flashed to them. After trying a few other BIOSes, I
still strongly recommend staying with the X3 BIOS as it is very feature rich.
- For instructions and different methods on how to flash the the BIOS:
BIOS Installation Section (Why
rewrite the same instructions twice. You can click a link. I know you can.)
-
- Flash Backup ROM: Click this one to update AKA
"flash" the Backup ROM where the Cromwell FlashBIOS is stored.
- The X3 Modchip has 256KB of memory in addition to the 2048KB of Main ROM set
asside for a rescue ROM when you screw up your Main ROM. This means you should
probably leave the backup ROM alone and don't touch it. I know it is tempting.
I updated mine to the latest v3.03 FlashBIOS so I'll include the instructions.
However this is risky, so be careful: Upgrading
the Backup BIOS Section
-
- BIOS Bank Select: Click this one to select a
different BIOS Bank.
- 1024KB of space is used up by your primary BIOS which should be installed in
banks 1-4 which your X3 Modchip will default to when the X3 switch is not hooked
up. The remaining memory can be used for other BIOSes or other versions of the
X3 BIOS, so Team Xecuter provided this feature to allow you to switch between
the different BIOS banks from within the X3 BIOS. Pretty Slick Huh?
- You can select from 256KB, 512KB, 1MB, and 2MB banks. If you have the front
switch hooked up, it is recommended that you just use it instead. Once you
select a bank size you can select a specific bank. Press the "Black" button to
see a display of the equivalent dip switch settings for the X3 switch on the
front of the XBOX.
-
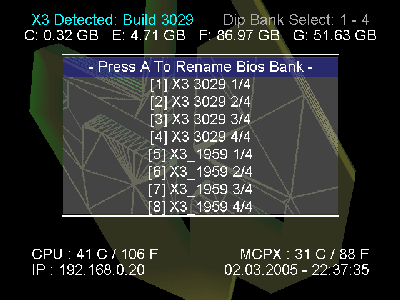
- BIOS Bank Naming: Click this one to rename the BIOS banks.
- So you don't like the default name of the bank? Fine, change it. Just make
sure to indicate at the end which part of the BIOS the bank is for BIOS' larger
than 256KB. For these larger BIOSes they span multiple banks.

- Once you click on a bank to rename you will get a standard keyboard screen
explained in the Common Dialogs part of the
User Interface & General Concepts Section
-
-
- Index
<< X3 Config Live Screen
Disk Tools Screen >>
Copyright ©2005 Tor Nichols. All Rights Reserved.


