This installation section covers installing the X3 Modchip, where the X3 BIOS can be found, flashing the BIOS, and other installation related issues.
I'm assuming you already have the Microsoft XBOX. Use the vendors on http://www.teamxecuter.com or search Google for the X3 Modchip Retailers. You should be able to find one for less than $65 including shipping. Watch out for those shipping charges some dealers pile on for all 6 ounces of components in the X3 kit.
Here are a couple good soldering guides: http://www.kpsec.freeuk.com/solder.htm or http://www.epemag.com/solderfaq/pictures.htm
Read these a few times and practice once or twice on a $2 board from radioshack.
Idealy, you should have done this before ordering the modchip, but you have to know which directions to follow. http://www.xbox-scene.com/versions.php
Team Xecuter has gone to great lengths to provide a complete installation guide. v1.0-v1.5 XBOX or v1.6 XBOX. Read these guides very carefully two or three times before doing it. Take your time: Installing the chip isn't a race. If you are patient, careful, follow all direction carefully and correctly, then your very first install will work just fine. Remember that your XBOX is sensitive to static. Follow good anti-static procedures.
Tips:A Hair Dryer or Heat Gun will help you warm up the stickers to lift them with a craft knife or other blade.
Wax Paper can be placed against the sticky part of the lifted stickers to keep the glue fresh and to keep the stickers from reattaching themselves in a bad spot.
Also use Wax Paper to go under the sticky pads that have to be lifted up too.
Touch a grounded metal structure (E.g. Lamp) often or use a grounding strap.
Add solder to the tips of the 3 wires first. Add a little drop of solder to the 3 tiny ass points on the XBOX motherboard second. Then solder the wires to the points.
Use electrical tape to hold the pin header or wires in place while soldering.
Use electrical tape to mask off nearby places on the motherboard to avoid soldering to the wrong spot.
Do *NOT* hold the soldering iron against a soldering point too long or you will burn your motherboard.
I, by far, prefer the "LPC Header" install. Soldering the least number of shitty wires is better.
Take your time and follow directions carefully. Those guides are very well written compared to many I have seen.
http://home.comcast.net/~x3guide/InstallationTroubleshootingFAQ.htm - Installation Troubleshooting FAQ from Unofficial X3 Guide & FAQ
http://www.xbox-scene.com/articles/leds.php - LED Color Meanings
http://www.xbox-scene.com/articles/lpc-diag.ph - LPC Diagnostics using a Digital Multi-Meter to test the board.
http://www.xbox-scene.com/articles/errorcodes.php - Error Codes Explained
http://www.xbox-scene.com/articles/red-orange.php - Fixing the FRAG Problems
Post 1 and Post 5 on http://www.teamxecuter.com/forums/showpost.php?p=32785
The XBINS group has a website for release information and an IRC channel / FTP server for getting the files. First read the XBINS FAQ.
Then if you are new to IRC, read the Using #XBins Tutorial.
Finally, once you have connected to the IRC channel and issued the trigger keep the IRC channel open and open an FTP program. I personally recommend FileZilla or LeechFTP as they are both free. The guides use a shareware program instead. The settings you need are the same for any standard FTP program: FTP Server, Username, Password. From there it is all about dragging and dropping files to transfer them to your computer. If you need to read the guide on FTPing at the end of the "Using #XBins Tutorial".
Tips:The Xecuter BIOS and Cromwell BIOS files are located in /XBOX/bios/Xecuter/Xecuter3 and /XBOX/bios/Xecuter/flashbios_cromwell respectively.
While you are logged in, go ahead and download a dashboard. I strongly recommend Avalaunch found in /XBOX/apps/dashboards/avalaunch/ as this dashboard is very full-featured.
FlashBIOS Tutorials: - Main Page Contains Some Basic InfoFlash Via HTTP - This method uses a network cable or wireless adapter to directly upload the BIOS to the XBOX. (Preferred)Flash Via Hard Drive - This method requires that you already have the BIOS .bin file on your XBOX harddrive. Not a good choice for brand new X3 installs.Flash Via Disc - This method has you create a CD or DVD with the BIOS on it. This can be tricky, but might be worth a try if networking is not an option.Additional Information:How To Create a Dummy File for a FlashBIOS Compliant CD or DVDHow To Create a FlashBIOS Compliant CDHow To Create a FlashBIOS Compliant DVD
Via Network: FTP or HTTP. The X3 BIOS has a basic FTP (File Transfer) and HTTP (Webpage) Server installed in it. Either of these can be utilized to update your BIOS. Both methods require that the XBOX be Networked first.HTTP Flash Method: (Recommended) - Use a Web Browser to transfer the BIOS .bin file.
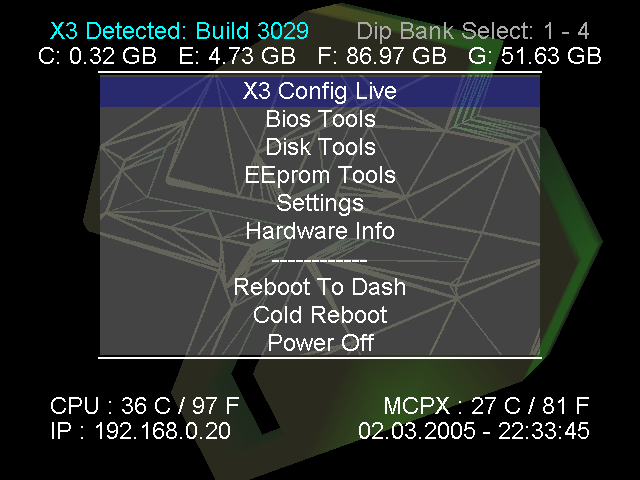
- Boot up the existing X3 bios on your XBOX.
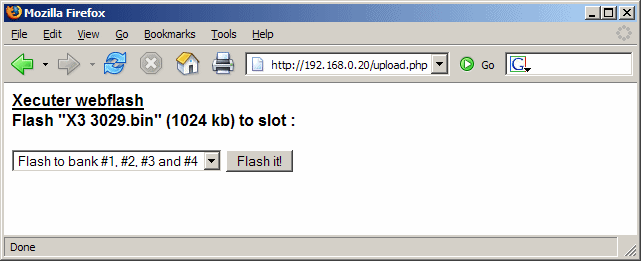
- Type the IP address of your XBOX into the address bar of your web browser (E.g. FireFox or Internet Explorer).
- Click "Browse" and locate the .bin BIOS file you already downloaded in Step 1 or type the location of that file including the filename into the textfield. Click the "Upload BIOS!" button.
- Select the Bank to flash the BIOS to. Generally the default bank is fine. Click "Flash It!".
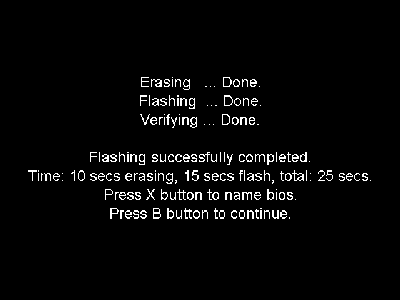
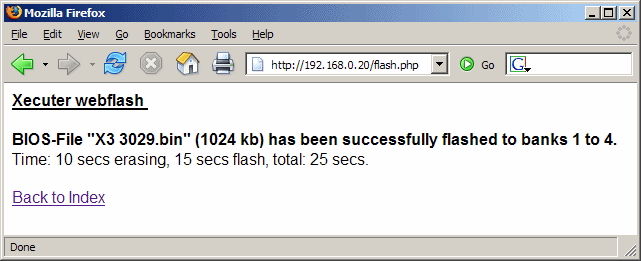
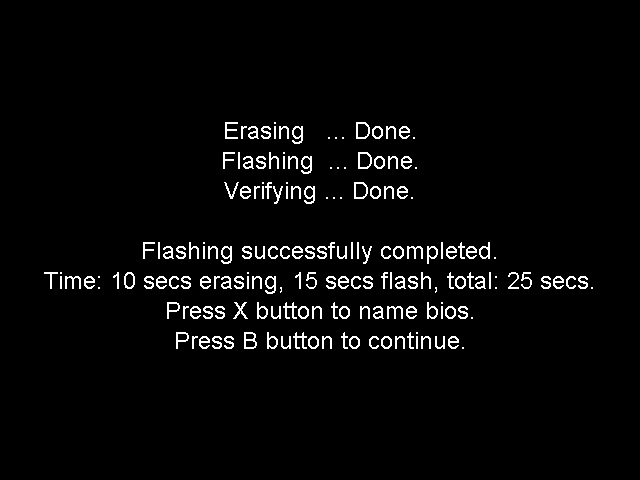
- Wait for the Flash process to complete. If you were flashing the Main ROM (E.g. First time X3 installs.) then you can give the BIOS a specific name by pressing "X", or you can accept the default name by pressing "B" to go back to the menus.
- Power off your XBOX, wait 10 seconds, and power it back on. (If the XBOX goes right to a game or dashboard, hold down the white button and reboot the XBOX again.)
If this is a new modchip, for instance, the following method *must* be used. If you messed up your main BIOS you can follow these directions by pressing and holding for a second or two both the "Power" and the "Eject" buttons on the xbox. This will start FlashBIOS v3.0x manually.FTP Flash Method: Use an FTP program to transfer the BIOS .bin file to the C: drive of the XBOX. Then from the existing X3 BIOS main screen:
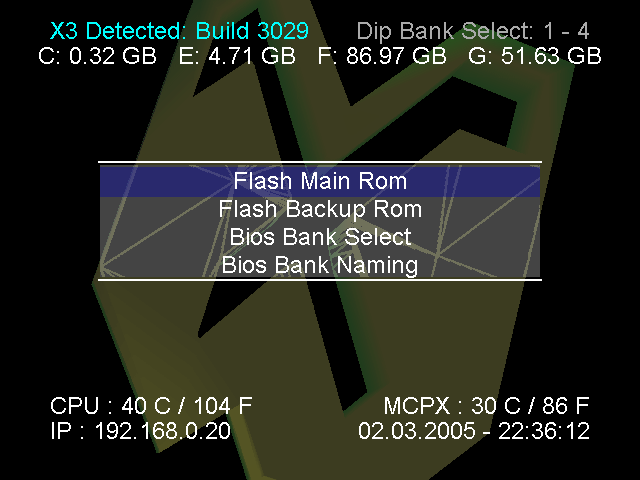
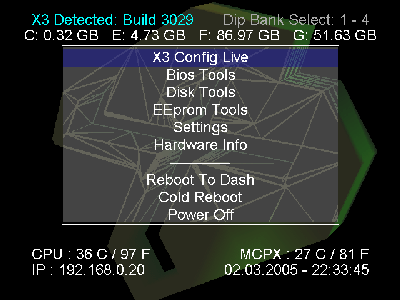
- Click on "Bios Tools".
- Click on "Flash Main ROM".
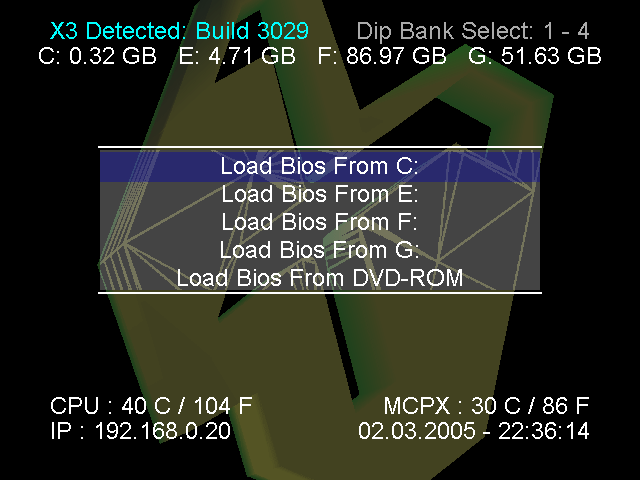
- Click on "Load BIOS from C:".
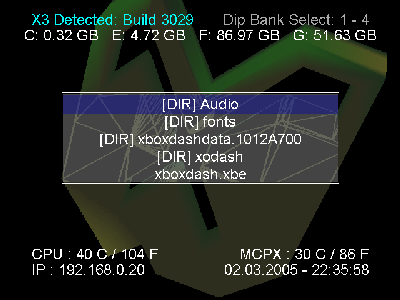
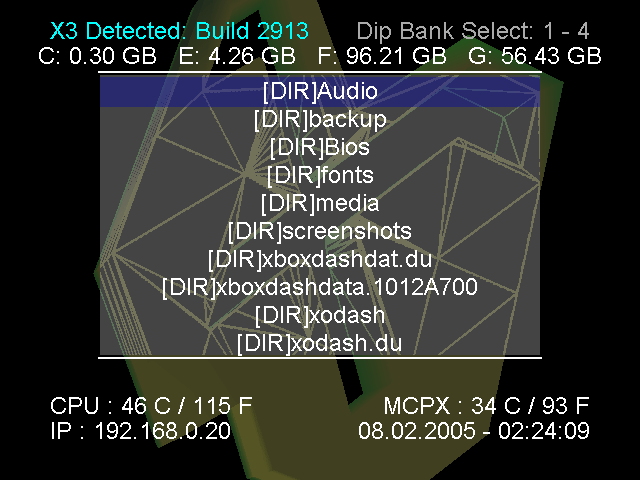
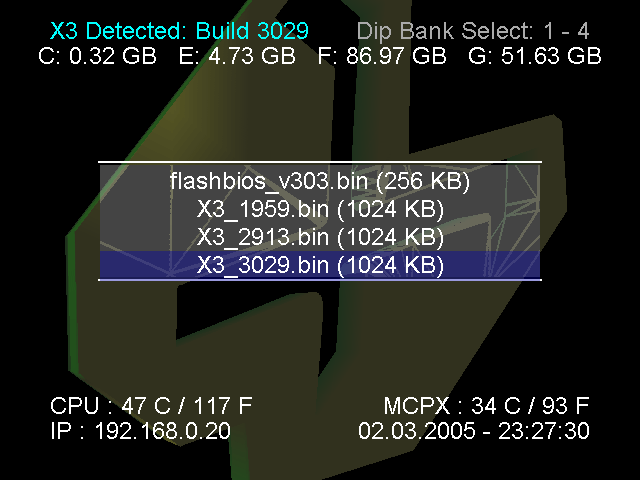
- Browse for the .bin (X3 ####.bin) file you uploaded and click it.
- Choose which bank to save the BIOS to. (Usually select the first choice.) Click "Yes" when asked "Are you sure you want to flash?"
- Wait for the Flash process to complete. If you were flashing the Main ROM (E.g. First time X3 installs.) then you can give the BIOS a specific name by pressing "X", or you can accept the default name by pressing "B" to go back to the menus.
- Power off your XBOX, wait 10 seconds, and power it back on. (If the XBOX goes right to a game or dashboard, hold down the white button and reboot the XBOX again.)
v1.0-v1.5 XBOX can use FlashBIOS 3.03
v1.6b XBOX can use FlashBIOS 3.03
v1.6 XBOX should use FlashBIOS 3.01
If you still must update the "Backup BIOS" then:FTP Flash Method: Use an FTP program to transfer the Cromwell BIOS .bin file to the C: drive of the XBOX. Make sure you are using the right version of the BIOS for your XBOX!!! Then from the existing X3 BIOS main screen:
- Click on "Bios Tools".
- Click on "Flash Backup ROM". ("Flash Main ROM" is pictured here, but be sure to select "Flash Backup ROM" instead.)
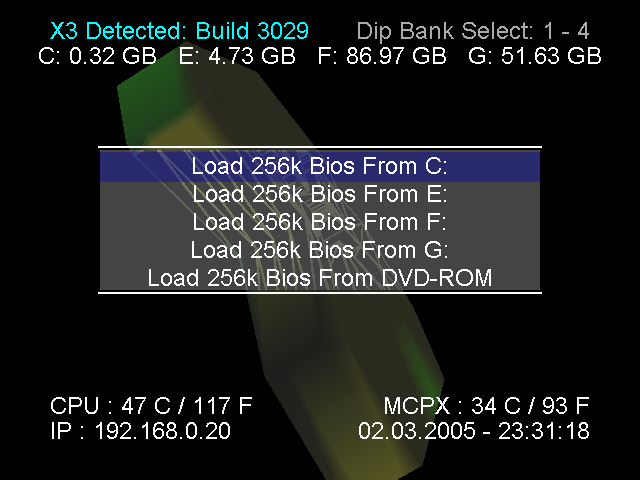
- Click on "Load 256k BIOS from C:" (or which ever drive you uploaded the new Cromwell FlashBIOS .bin to.)
- Browse for the .bin (X3 ####.bin) file you uploaded and click it.
- Click "Yes" when asked "Really flash the Backup Flash Rom?"
- Wait for the Flash process to complete. You can press "B" to return to the main BIOS you had booted earlier.
Copyright ©2005 Tor Nichols. All Rights Reserved.